Last updated on 2011-03-09, by
How to use HD Video Editor?

HD Video Editor
Free Download HD Video Editor
only $40.00 

HD Video Editor maximizes your ability to edit videos. Editing video, adding soundtracks and text titles, applying filters and artistic effects as well as adding transitions are all at your disposal with this amazing video editor software. Here is what you can do with HD Video Editor:
a. Edit video with separate video, audio and title tracks in video editing timeline panel.
b. Import rich media sources: screencast, video and audio capture from camcorders, TV-tuners and VHS captures.
c. Apply professional filters, special effects as well as video and audio transitions.
d. Get automatic slideshow
e. Share your edited video in multiple ways.
f. Fast and smooth HD video editing.
Download, install and run HD Video Editor. This is the first interface you can see when you launch this video editing program.
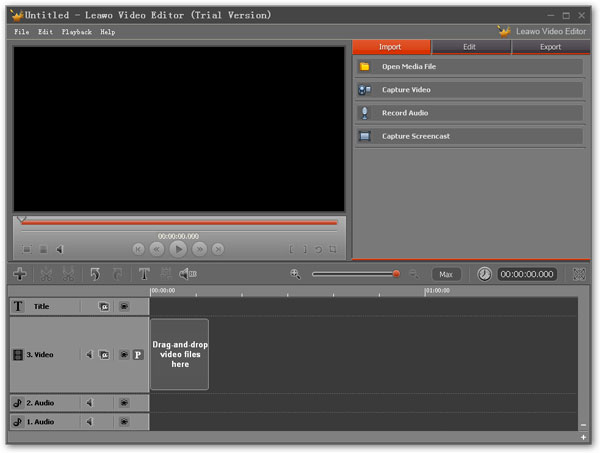
How to use HD Video Editor?
Step 1: Input your media source.
HD Video Editor supports most popular video and audio formats. Plus, with HD video editing software you can import graphics into your videos.
Capture video from DV c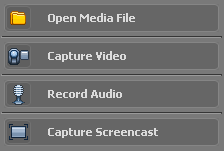 amera and TV-tuner, add MPEG-2 TS and AVCHD video from camcorder, use family videos stored on VHS cassettes.
Easily expand your soundtrack with do-it-yourself audio recordings using a microphone, synthesizer, electric guitar, or any other sound card input.
Want to share computer tips and tricks with others? Capture digital video of what’s happening on your computer screen and add a voiceover – with HD Video Editor’s built-in screencast feature.
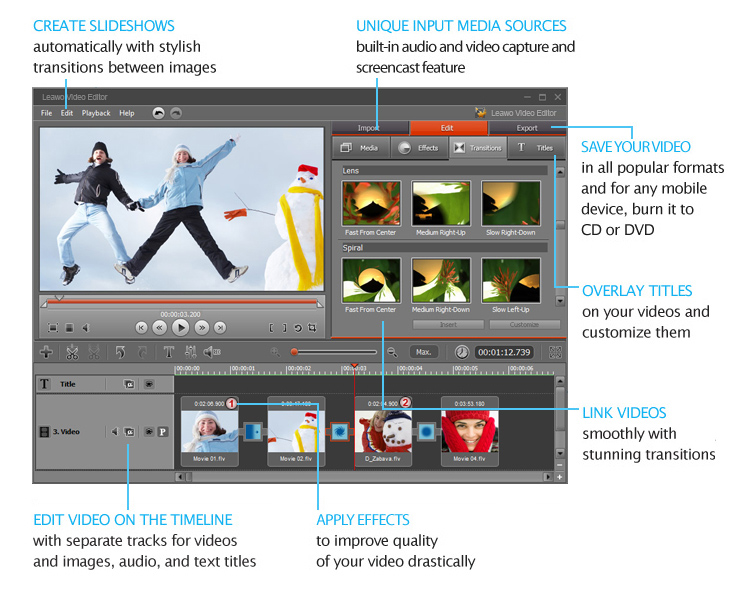
Step 2: Video editing
In timeline panel you can edit added video, lay audio tracks over it and add text titles to be displayed on the video at the playback. Here you can mute or enable a track just by pressing the “Mute” icon beside it; drag the slider in the field scale to set the editing scale; drag the ” Opacity” button up or down to change the transparency level; drag the “Volume” slider to change the volume level for the track.
Use effects and transitions:
a. Go to “Edit” panel–Choose an effect from “Effects” tab to apply to your video and press the button “Apply” and you can also right-click the icon, choose a necessary effect and press “Customize” to define the effect settings.
b. Go to “Edit” panel–Drag the necessary transition in the “Transition” tab and drop it before or after a necessary clip or between two clips to the Timeline panel and you can press “Customize” to define the transition settings.
Split the video:
Just choose the preset value for automatic splitting or spilt the video manually by marking the start and end point.
Step 3: Export media files
Choose output format, adjust the output settings and choose a path for saving destination file in the output setting panel.
Note: You can choose your desired format, video and audio codec by clicking “Format…” button beside the “Format” drop-down list to open “Format Setting “ dialog box.
Press “Save as Video File” to save your project as a video file.
Press “Save for Mobile Device” to save your project for a mobile device.
Burning CD/DVD:
a. Choose the tab “Data”, “Audio” or “Video” to create the disc.
b. Add the files you would like to burn. Make sure that the total file size does not exceed the disk size.
c. Insert empty or rewritable CD/DVD into your drive.
d. Press the button “Burn DVD” to launch Burning/Saving Wizard.
e. Choose the drive, type the disc name, set the burning speed and press “Next” to continue.
f. HD Video Editor will start burning.
HD Video Editor
Free Download HD Video Editor
only $40.00
-

[100% Works] Latest 10 Lookmovie2.to AlternativesPatrick/2024-07-09
-

YesMovies Alternatives: Sites Like YesMovies to Watch MoviesPatrick/2024-07-09
-

7 Best Websites for Tamil Movies Download for FreeLeia/2024-06-26
-

4 Methods to Download OnlyFans Videos on PCLeia/2024-06-26
-

How to Convert MP2 to MP3 with MP2 Converter?Cassie/2024-06-25
-

A Comprehensive Guide: How to Download Netflix Movies?Cassie/2024-06-25
-

How to Download Shows on Hulu?Cassie/2024-06-25
-

Free Legit XMovies8 Alternatives for Online Movies StreamingPatrick/2024-06-20
-

Is WAV Better Than FLAC? How to Convert FLAC to WAV?Cassie/2024-05-31
-

6 Best Netflix Downloaders to Download Netflix Movies & ShowsCassie/2024-05-31